Sunday, 6 March 2016

Amsterdam 2016!


Hey everybody! Welcome back!
I finally have a minute to sit and write a post on my recent trip to Amsterdam, I went back to work the next day so it was hard to find time to go through all my pictures and write a good post. So as I'm off today I'm doing it!

We had such an amazing 4 days in this beautiful city!
It such a different vibe to what we would be used to here, It's super busy there all day every day but its not stressful, it's a lovely city to just walk around for the day and take in all the sights. We of course went to see the most famous attractions of Amsterdam but we also visited The Anne Frank House which was an amazing experience! cameras were forbidden so I don't have any snaps of there, but if you ever go to Amsterdam I would really suggest going there, just go super early in the morning, even at 11 A.M. we were queuing for 1 and 3/4 hours! Madame Tussauds, The Heineken Experience and we also visited the Museum of prostitution in The Red light district which was actually amazing! It really opens up your eyes to that whole aspect of Amsterdam and showed us the raw reality behind it all!

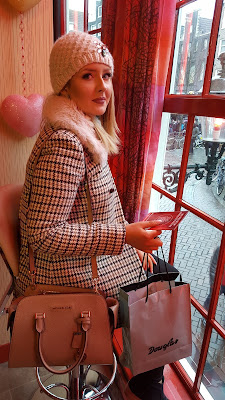
So here are a few pictures of our amazing trip! I would highly suggest visiting this place sometime in your life, it really is like another world!
Enjoy!


Dam Square
Madame Tussauds


Red Light Secrets


The Heineken Experience


So there is my favourite snaps from our trip!
I enoyed it so much, there is so much to do and see there everyday!
I really would suggest it to anyone!

Hope you enjoyed everyone, Hope you all enjoy the rest of your Sunday!

Until the next time!


Monday, 15 February 2016

A Closer Look: The SOSU Complete Contour Palette & How To Use It.


Hey Everybody, Welcome back!

Today I am back with a post on one of the most sought after items in the beauty community in Ireland at the moment, obviously referring to the amazing SOSU Complete Contour Palette by the Beautiful Suzanne Jackson.
As a lot of you might know it is nearly completely sold out at the moment and wont be back in stores until May, but she is putting some on pre-sale tonight on her website to be delivered by March so keep an eye out for that!

Suzanne is really such a huge inspiration and has made such a successful self made career for herself, the second I heard she was releasing her third SOSU product, being the contour palette I just knew It was going to be amazing and high quality, but it's actually more than I expected!

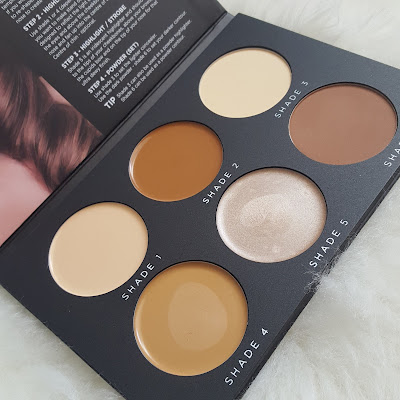
Here is a closer look at the palette and how I use it!


The Packaging is classy, simple and chic! I love it!


The Contents of the palette are 6 shades. 4 creams and 2 powders. It also comes with a step by step guide on the inside which is such a great idea! Inside the palette You get:

- 2 Highlight Creams (Shade 1) (Shade 4 can be used as either a highlight, foundation or Contour colour depending on your skin tone) I adore Shade 1 for carving out my eyebrows!

- 1 Contour Cream (Shade 2)

- 1 Highlight Powder (Shade 3)-To set highlight cream and/or Concealer)

-1 Highlight Cream (Shade 5)-This is intended for the tops of your cheekbones, bridge of the nose, cupids bow etc.)


-1 Contour Powder (Shade 6)-This is to set the areas you contoured with shade 2. This can also be used alone for a softer day time look)

Below is an example of where is best and where I like to apply my contour and highlight creams using the SOSU Complete Contour Palette:


The Broken Dotted lines stand for the cream highlight (Shade 1) You want to focus this colour on the inside of your face to make these features stand out:

-Under Eyes
-Bridge of Nose
Cupids Bow
-Forehead

The Bold Black Lines Stand for the Cream Contour (Shade 2) You want to use this shade to make features recede. If you want to contour your nose you would use this shade to make it appear slimmer and more aligned. I broke my nose when I was 3 and it never set right so I like to contour my nose to give the impression that it's structured. You also want to apply this shade to:

-Underneath Cheekbones
-Temples of Forehead & Hairline
-Sides of Nose, Underneath Jawline (optional)

 Applying a darker shade around the perimeter of the face is going to give the illusion of an Oval face shape, which is what we want!
After applying your creams you then want to blend them all together. I would suggest starting with the dark cream first, that way if you feel its too dark you can lighten it up a bit when blending your highlight cream. 

When finished blending I like to powder my face lightly and then Bake underneath my cheekbones  with a translucent powder and leave it sit there for 5-10 minutes, this cleans up your contour lines a lot and makes them look a lot more precise. I also set underneath my eyes using (Shade 3) to prevent any creasing-which it does an amazing job at! and lighten up the area a bit more. After that I wipe away the translucent powder that was baking and apply the powder contour (Shade 6) to the areas I cream contoured earlier.

I then finished up my makeup as usual and this is how it turned out!


I have to say I am blown away by the quality of this palette! These photos were taken on my Snapchat and have no filters what so ever applied to them, it really just makes your skin look flawless! It is so user friendly and has everything you could need! I never cream contoured before using this palette and it was really so simple! The guide on the inside of the palette will really help if you're not too familiar with contouring.
It caters for day time and night time looks which is fantastic as It cuts down the amount of product's you have to use. I noticed my skin looked flawless after applying this and not one bit cakey which is a bonus!

I believe the palette will be back in stock online and in stores in May. But SOSU.ie will be doing a pre-sale tonight at around 8 P.M. on the palettes and they will be delivered in March!
So I hope this blog post inspires you to give contouring a whack! And I would suggest using this palette 110%. It's caters from beginners to make-up junkies!

 Best of luck to anyone hoping to get their hands on a palette tonight!

Have a great week everyone & Thank you for reading


Saturday, 6 February 2016

My Tips To Achieving The Perfect Brows


Hey Everybody!
Welcome to my first blog post of February!
For this post I've decided to share a few of my little tips to achieving the perfect brows!
I've only recently mastered the sculpting technique myself and I've seen it make a major difference in Giving my eyebrows a cleaner, crisp shape!
So here's my steps that I use to achieve it!


1. Picking the right pencil

I have tried nearly every pencil on the market it seems and I've tried every price point. I've realised that wax based pencils are not for me. I have thinner brows and wax pencils didn't make them appear very natural. So I took the plunge and tried the infamous Anastasia Brow Wiz which is a dryer formula and I absolutely loved it! Though when I ran out of it I needed something else to keep me going until I could re-order one. So I tried the NYX eyebrow pencil and was blown away to find it's practically a dupe for the brow wiz! Same type of formula and pencil shape. I've been using It for nearly a year now and I don't see myself ever changing it up! I would highly recommend to anyone, from people starting out to regular makeup gurus! I know it's available in Sam McCauley's Midleton currently. I use the shade Light Brown.

Nyx Eyebrow Pencil. (Light Brown)

2. Sculpting 

I have only recently started doing this technique and it honestly makes such a difference to my eyebrows! After you have filled in and shaped your brows, take a little bit of concealer and an angled brush, very carefully run the concealer just underneath your eyebrow, then carefully blend out with your finger. It leaves your eyebrow super sharp and clean. It also erases any wobbly lines that may have occurred! There are countless YouTube Tutorials on this technique and it's actually very easy to
master. Here are the two products I love to use!

Real Techniques Eyebrow Brush.
Maybelline Superstay Better Skin Concealer. (02 Light-Clair)
    
3. Setting Your Brows
Finally you want to make sure those fleeky brows stay put all day long! Setting them with an eyebrow gel (Clear or tinted-personal preference!) will ensure just that. I personally really like the Rimmel Brow This Way. It keeps my eyebrows in place and in shape all day, and if I go a bit heavy on the pencil, the light tones in the gel lighten them up a bit! It also has a precise little brush so it wont get onto your surrounding skin and it sweeps nicely through every brow.

Rimmel Brow This Way-Brow Styling Gel. (001 Blonde)

Here is the finished look!

It took me a loooong time to get a hold on my eyebrows trust me! If your 13 or 14 and reading this DO NOT PLUCK YOUR EYEBROWS haha!
It really is worth it to leave them grow out and get them shaped professionally. Once you over-pluck the odds of the hair re-growing is very slim.

I hope you enjoyed this post!
Have a great weekend everyone!

XO


Wednesday, 27 January 2016

Online SS16 Inspiration I'm Lusting Over!


Hey Everybody!
Long time no blog! :( I lost my funk a little bit the past 2 weeks but my heads back in the game and I'm delighted to be back at it!

I'm so ready for spring and summer this year, I feel like it's been winter forever and with the Irish weather at the moment it looks like it will be for another while! But I can't wait for the longer evenings and summer days so I've been looking at some online stores getting some inspiration for S/S fashion and here's what I'm absolutely loving!
It's a collection of day time looks, casual and night time looks. Also some celebrity looks that are inspiring these pieces by the stores.

Predictions for SS16 trends are ranging from utility to nautical to the comeback of the minimalistic 90's! (which I'm pretty excited about!) Blush shades are predicted to be huge as well! Fashion always comes full circle and repeats trends but always in a fresh and inspiring new way!

 I've noticed myself that the tailored look seems to be trending like crazy! Structured suit pants, Blazers and Tux dresses. I love this style I think it really flatters every body type!
I've also included some must have summer pieces I'm loving such as jumpsuits, playsuits dresses etc.
All direct links to the items will be listed at the bottom!

All just in time for pay day ;)
Happy Shopping!


In The Style


Missguided

To get Emily Ratajkowski's look pair the above trousers with a white Bralet, both available Here to achieve minimalistic, chic 90's Vibes!


Pretty Little Thing

All Links to Items:

ITS Trench Coat:              HERE
ITS Crochet Playsuit:       HERE
ITS Bomber Jacket:          HERE
ITS Rust Utility Playsuit: HERE

MG Wide Leg Trousers:  HERE
MG White Bralet:            HERE
MG Cigarette Trousers:   HERE & Co-ord Longline Blazer: HERE
MG Biker Coat:               HERE

PLT Cross Trousers:       HERE
PLT Shoulder Blouse:     HERE
PLT Maxi Dress:             HERE


I hope you enjoyed this post everyone and thank you for reading!
Have a fab & safe weekend whether you're heading out or staying in.

Until The next time!

XO


Sunday, 10 January 2016

My Makeup Removal/Cleansing Routine.


Hey Everyone & Welcome back!

Today's blog is all about makeup removal and cleansing your face!
If I could give anybody the most important tip when it comes to makeup its definitely to get yourself a good cleansing routine and no matter how tired you are always take off your makeup at night to leave your skin breathe and renew itself. I used to have an awful habit of sleeping with my makeup on and it used to cause havoc on my skin!
I suffered from awful texture and bumps and painful breakouts. So I decided to search for cleansing products and build a routine that suits me and that my skin agrees with.


It's all trial and error when it comes to skincare because 1 product isn't going to suit everybody. But I've been using this routine for nearly a year now and my skin has never been better! I still get the monthly breakouts of course but they can also be dealt with! So here is a little bit about my routine!
 
Just a little disclaimer, the majority of these products are all high end but they really are the only ones that agree with my skin. I've tried drugstore and unfortunately my skin just didn't like it! Although these are expensive, they last me for months on end and I really see my skin improve the more I use them! So in my eyes they are worth the money. 

Step 1: Eye Makeup Removal


I like to remove my eye makeup before the rest of my face makeup. I just soak 2 cotton rounds with this fantastic makeup remover, place them on my eyes for a few seconds, then gently rub it in circular motions. I wrote a blogpost about it not so long ago which you read Here . It has everything you need to know along with prices!

Step 2: Cleansing The Face


Next in the routine is a cleanser. There is a variety of cleansers available on the market for all different skin types and skin needs. You can choose from milks, balms, oils, micellar waters etc. I've used them all and I must say this Clarins Cleansing milk is by far my favourite! It smells delicious and removes makeup so easily! It also removes eye makeup but I prefer to use an eye makeup remover! I remove it with a damp Cellulose sponge pictured above. You can buy these pretty much anywhere, these ones are from pennys!

Step 3: Cleansing Face Wash/Exfoliate

Next up is another cleanser, but this time using a foaming cleanser is really going to penetrate deep into your pores and remove any residue that the cleansing milk didn't get to. Double cleansing is really going to make a difference with your skin, so it can breathe properly overnight. Also once or twice a week I love using an exfoliator to remove dead skin cells and build up of makeup from wearing it during the week! This keeps my skin smooth and leaves my makeup application looking flawless.

Step 4: Aftercare


Finally we are going to put back all the moisture into our face that we lost during cleansing. Again this step is all down to personal preference and what your skin needs. I like to use the Clarins Hydraquench lotion, I've noticed since I hit 22 that my skin has been feeling a bit dryer so this really helps keep it fresh and avoids it feeling tight after cleansing. I follow it up with the Vichy Idealia Moisturiser, I love this stuff! It's a really thick consistency and upon application leaves my skin feeling so soft and supple! It leaves a gorgeous glow on the skin as well. Then for my eyes I use Bio-Oil! I was using an eye gel before and I ran out, I didn't use anything on my eyes for a few days and actually noticed the area beginning to look very dry, I also saw a lot of fine lines emerging so, I had a bottle of Bio-Oil lying around and decided to give it a go & I haven't put it down since! My under eye area has never looked plumper amazingly! and the bottle would last you a lifetime. I'd really suggest giving it a go. Finally if I have any face demons I adore using the Vichy Normaderm Hyaluspot! It's a god send. It sting initially for a few minutes, but it takes down the swelling and redness over night and avoids leaving any red marks. A holy grail product!

So that's my skincare/Makeup removal routine! I hope you found it helpful!
If you have any questions please ask me, you can contact me via Instagram, facebook or on this! 

Have a great week everyone!
Until the next time!


XO