Hey Everybody, Welcome back!
Today I am back with a post on one of the most sought after items in the beauty community in Ireland at the moment, obviously referring to the amazing SOSU Complete Contour Palette by the Beautiful Suzanne Jackson.
Today I am back with a post on one of the most sought after items in the beauty community in Ireland at the moment, obviously referring to the amazing SOSU Complete Contour Palette by the Beautiful Suzanne Jackson.
As a lot of you might know it is nearly completely sold out at the moment and wont be back in stores until May, but she is putting some on pre-sale tonight on her website to be delivered by March so keep an eye out for that!
Suzanne is really such a huge inspiration and has made such a successful self made career for herself, the second I heard she was releasing her third SOSU product, being the contour palette I just knew It was going to be amazing and high quality, but it's actually more than I expected!
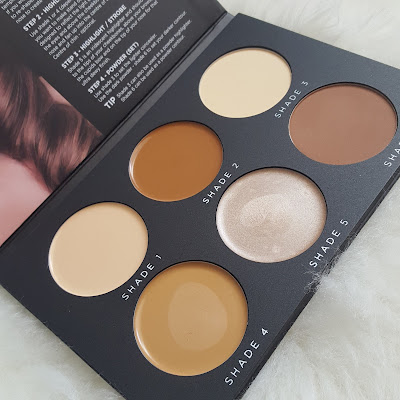
Here is a closer look at the palette and how I use it!
The Packaging is classy, simple and chic! I love it!
The Contents of the palette are 6 shades. 4 creams and 2 powders. It also comes with a step by step guide on the inside which is such a great idea! Inside the palette You get:
- 2 Highlight Creams (Shade 1) (Shade 4 can be used as either a highlight, foundation or Contour colour depending on your skin tone) I adore Shade 1 for carving out my eyebrows!
- 1 Contour Cream (Shade 2)
- 1 Highlight Powder (Shade 3)-To set highlight cream and/or Concealer)
-1 Highlight Cream (Shade 5)-This is intended for the tops of your cheekbones, bridge of the nose, cupids bow etc.)
-1 Contour Powder (Shade 6)-This is to set the areas you contoured with shade 2. This can also be used alone for a softer day time look)
Below is an example of where is best and where I like to apply my contour and highlight creams using the SOSU Complete Contour Palette:
The Broken Dotted lines stand for the cream highlight (Shade 1) You want to focus this colour on the inside of your face to make these features stand out:
-Under Eyes
-Bridge of Nose
Cupids Bow
-Forehead
The Bold Black Lines Stand for the Cream Contour (Shade 2) You want to use this shade to make features recede. If you want to contour your nose you would use this shade to make it appear slimmer and more aligned. I broke my nose when I was 3 and it never set right so I like to contour my nose to give the impression that it's structured. You also want to apply this shade to:
-Underneath Cheekbones
-Temples of Forehead & Hairline
-Sides of Nose, Underneath Jawline (optional)
Applying a darker shade around the perimeter of the face is going to give the illusion of an Oval face shape, which is what we want!
After applying your creams you then want to blend them all together. I would suggest starting with the dark cream first, that way if you feel its too dark you can lighten it up a bit when blending your highlight cream.
When finished blending I like to powder my face lightly and then Bake underneath my cheekbones with a translucent powder and leave it sit there for 5-10 minutes, this cleans up your contour lines a lot and makes them look a lot more precise. I also set underneath my eyes using (Shade 3) to prevent any creasing-which it does an amazing job at! and lighten up the area a bit more. After that I wipe away the translucent powder that was baking and apply the powder contour (Shade 6) to the areas I cream contoured earlier.
I then finished up my makeup as usual and this is how it turned out!
I have to say I am blown away by the quality of this palette! These photos were taken on my Snapchat and have no filters what so ever applied to them, it really just makes your skin look flawless! It is so user friendly and has everything you could need! I never cream contoured before using this palette and it was really so simple! The guide on the inside of the palette will really help if you're not too familiar with contouring.
It caters for day time and night time looks which is fantastic as It cuts down the amount of product's you have to use. I noticed my skin looked flawless after applying this and not one bit cakey which is a bonus!
I believe the palette will be back in stock online and in stores in May. But SOSU.ie will be doing a pre-sale tonight at around 8 P.M. on the palettes and they will be delivered in March!
So I hope this blog post inspires you to give contouring a whack! And I would suggest using this palette 110%. It's caters from beginners to make-up junkies!
Best of luck to anyone hoping to get their hands on a palette tonight!
Have a great week everyone & Thank you for reading


